


The Formula
The Shii-Cho Formula is based around the number 3. Three guards, Three strikes, Three steps. It has also been called the “Force of Three”. From these three, come everything else. We have three target areas divided between each side of our bodies, head-limbs-body. The Marks of contact divide the zones into 3 further areas. The parries come from each of the three guards and can protect the entire body.
The Target Zones
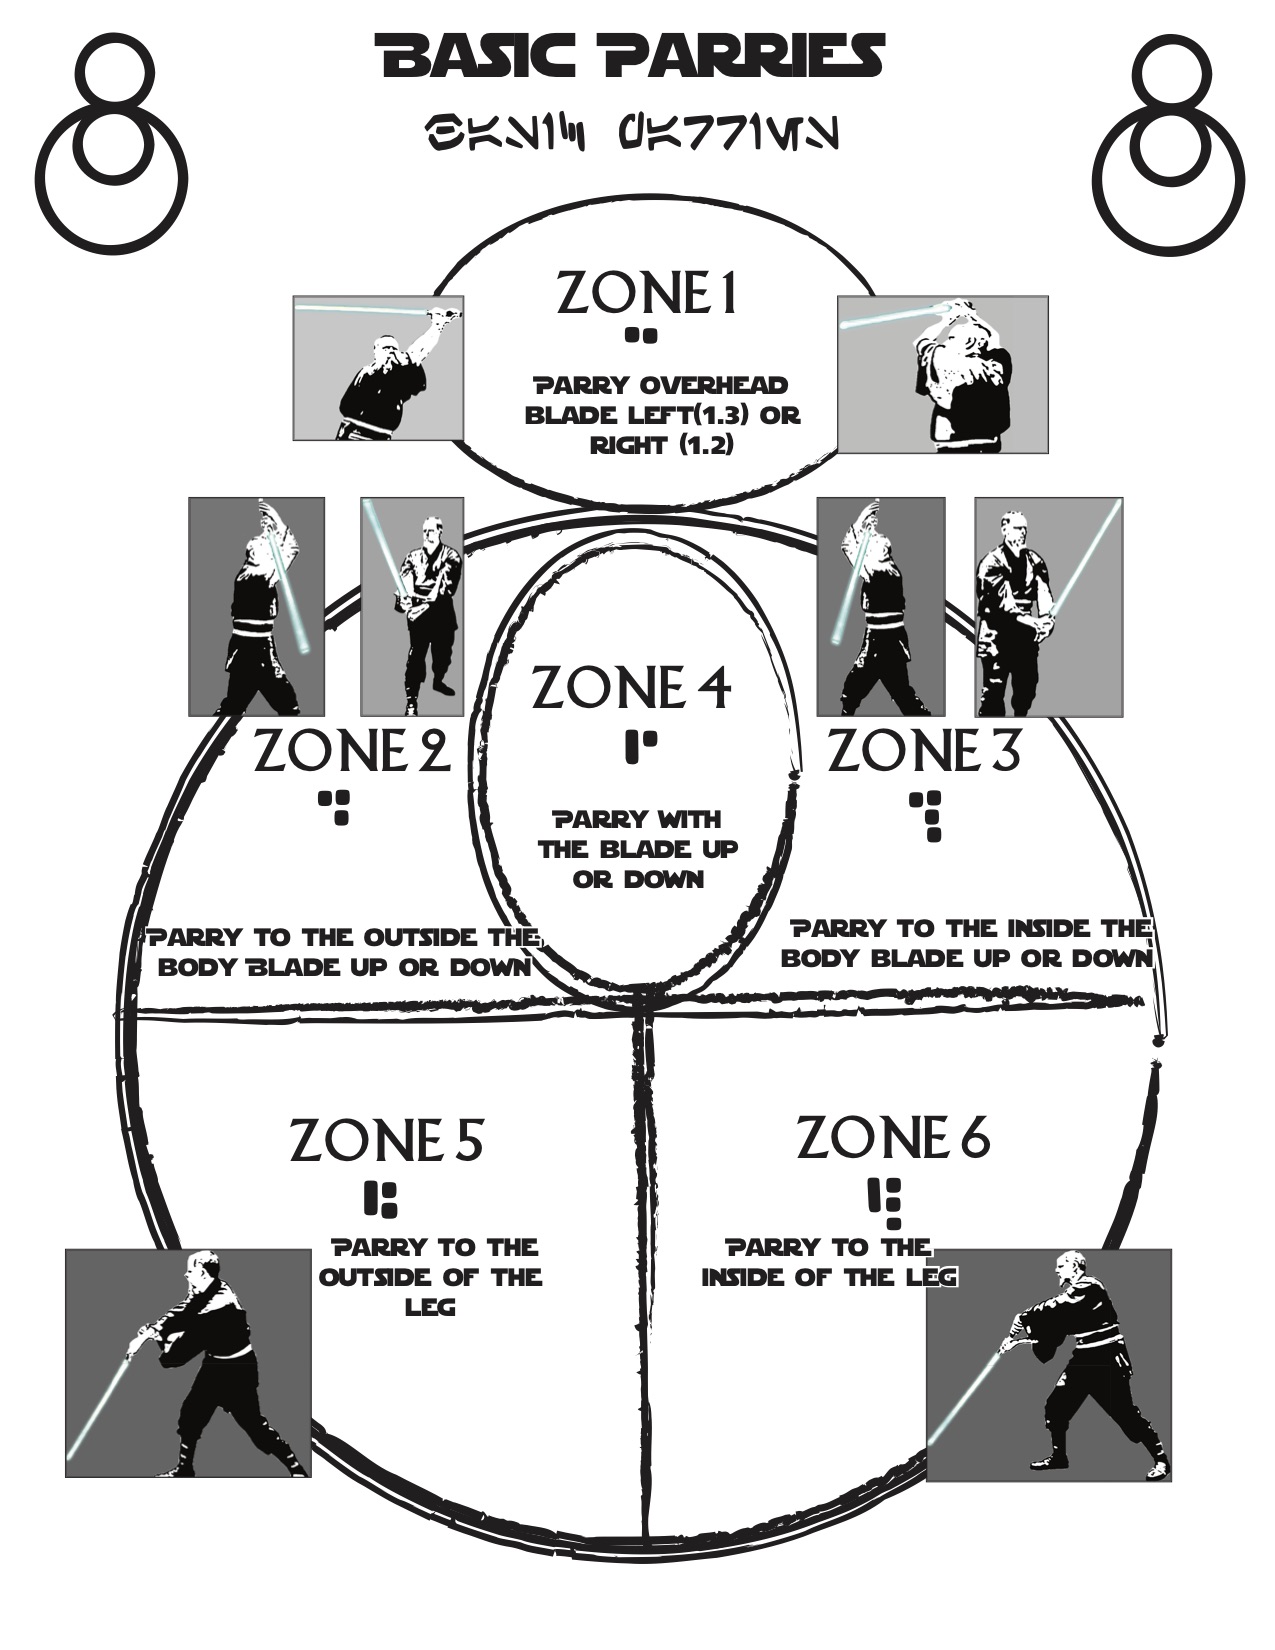
The body is divided into 6 distinct zones for targeting and protection.
It is represented by this symbol:

Zone 1: head
Zone 2: weapon arm
Zone 3: non weapon arm
Zone 4: body
Zone 5: weapon side leg
Zone 6: non-weapon side leg
It is important to note that the orientation of the zones is based off of the head, body and weapon arm. this makes it easily deciphered without subjective directions. If one parries to zone 3, they do so to their own person. If they strike to zone 3, they do so on their opponent. This limits the confusion when practicing or sparring. When in actual combat, it should be intuitive.
The Three Guards
The three guards used in Shii-Cho allow one to defend or attack any of the zones. They are simply put; low, middle, and high guards. Each one has it’s purpose and application. There are again three aspects to each guard; stance, body, and blade positioning. Each guard is has multiple interpretations and should be seen and general categories rather than static poses. Ready stance (Attack/Defense): Footwork for Shii-Cho is characteristically simple. The stances for each guard are the same. Zone 5 foot forward, toe pointing straight, zone 6 foot behind turned out 45-90 degrees, the weight is in the middle but toward the back , hip is tucked, and the back is straight. By straight we mean not flexed or hunched. Leaning will be utilized to develop full body power later on.
With your zone 5 foot forward, this is called “attack stance” as it is very aggressive. With the opposite foot forward, it is called “defense stance” as it is more defensive in nature.
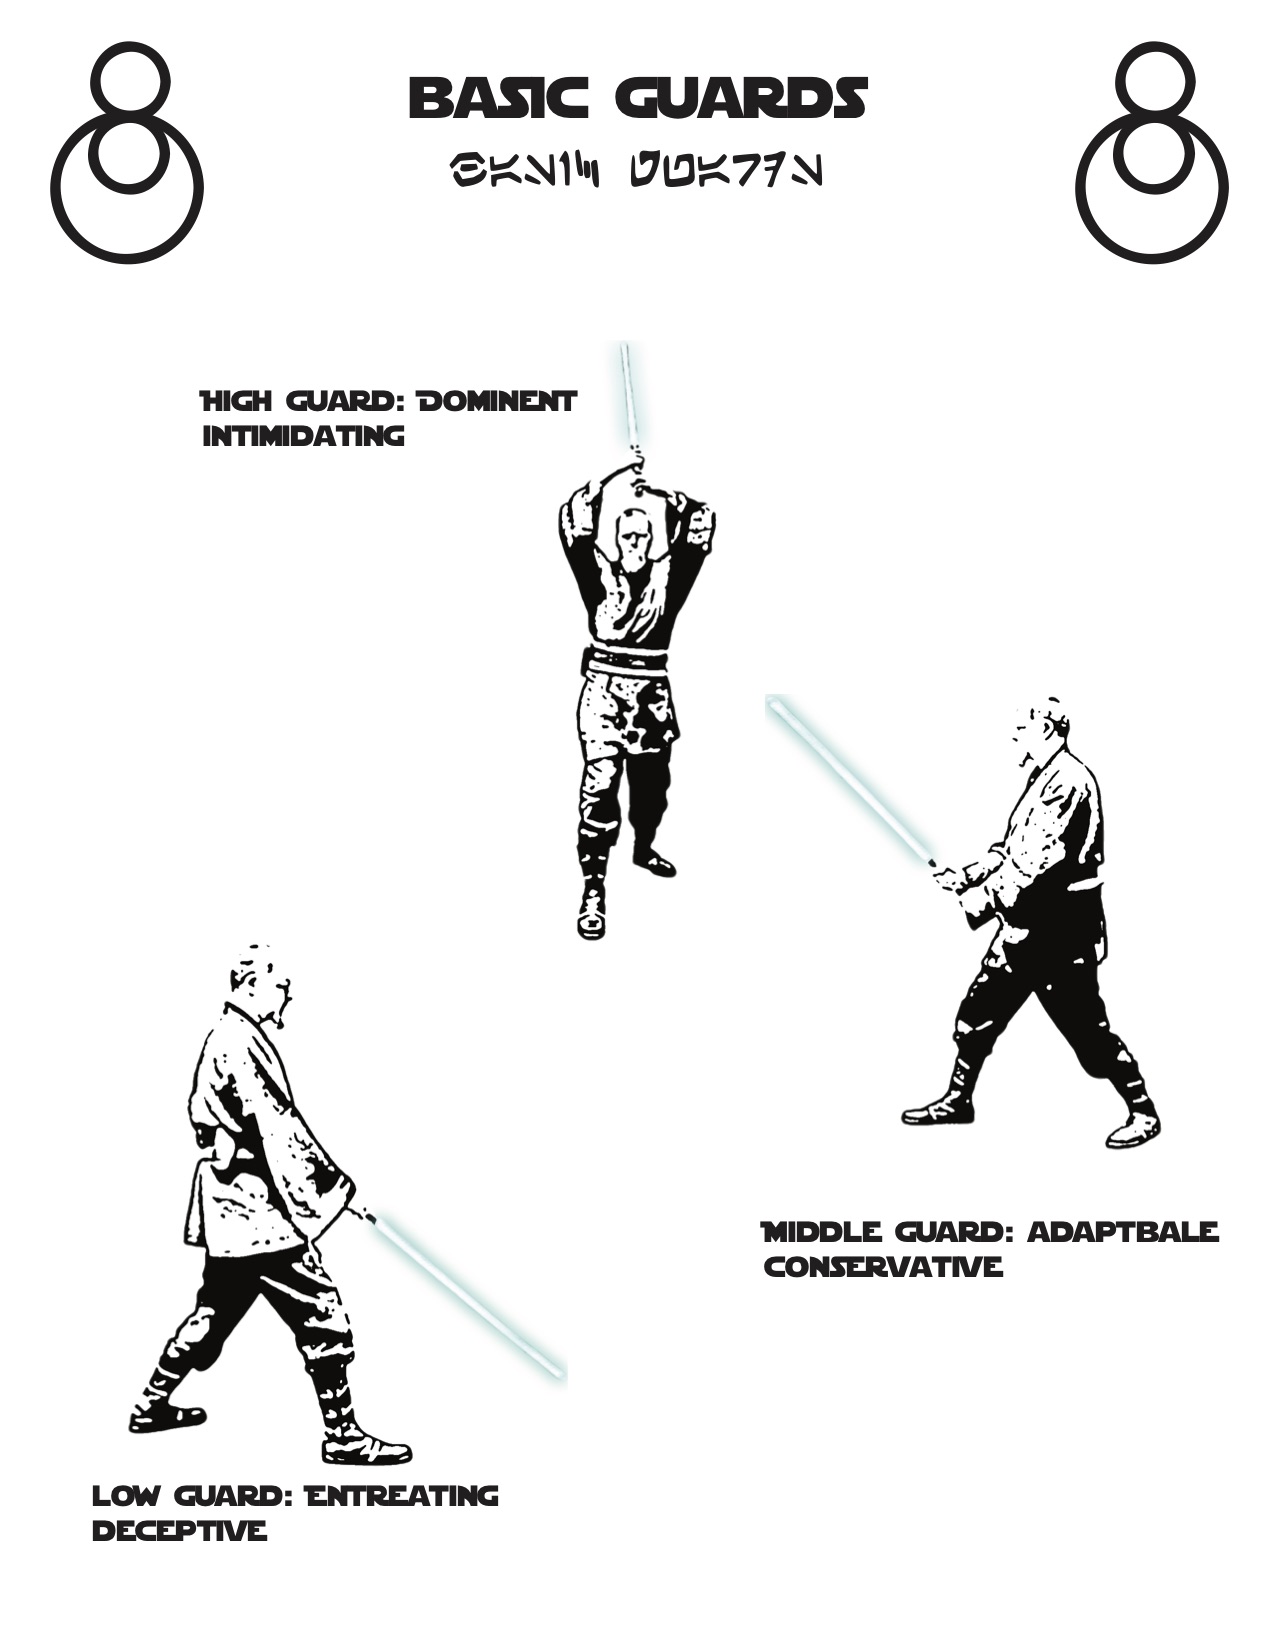
Middle Guard
Middle guard is the most basic and useful of all guard positions. It offers safety and ease of attack. As such, the danger of middle guard is getting too comfortable in it and merely defending from this one position.
Assume the ready stance described before. Take your zone 2 hand (dominant) and grip the saber by the emitter. Take the other and and grip it lightly at the pommel. The hands should be a distance apart. They should not be held together or touch or a loss in mobility will result. The blade should angle up so that the tip is about eye level with you.
High Guard
High guard is a dominant position. Most people who see it for the first time assume it is overtly showy. Novices often think it leaves you open to attack and will often stay in middle guard to avoid it. But once you get used to the strategy, high guard becomes a most desirable position.
Begin in middle guard, attack stance. All the requirements for the stance and body are identical. But raise your arms and hilt up as one solid unit so that the blade is angled back and up, while the pommel is just inside your peripheral vision. Often, one feels the need to put their weight forward on the front leg, this is acceptable as long as all body and stance considerations are in place.
Low Guard
This guard has the same effect as high guard but offers different options. If the opponent is overly aggressive, low guard is a highly useful technique. It can launch quick strikes from near invisibility. It is a wonderfully effective counter to over the head and downward strikes.
Assume the ready stance and point your saber tip toward the ground in front of you in line with your foot. Keep the shoulders relaxed and weight settled on the back foot but also keeping some in the front. this will enable you to go backward or forward.
The 3 Steps
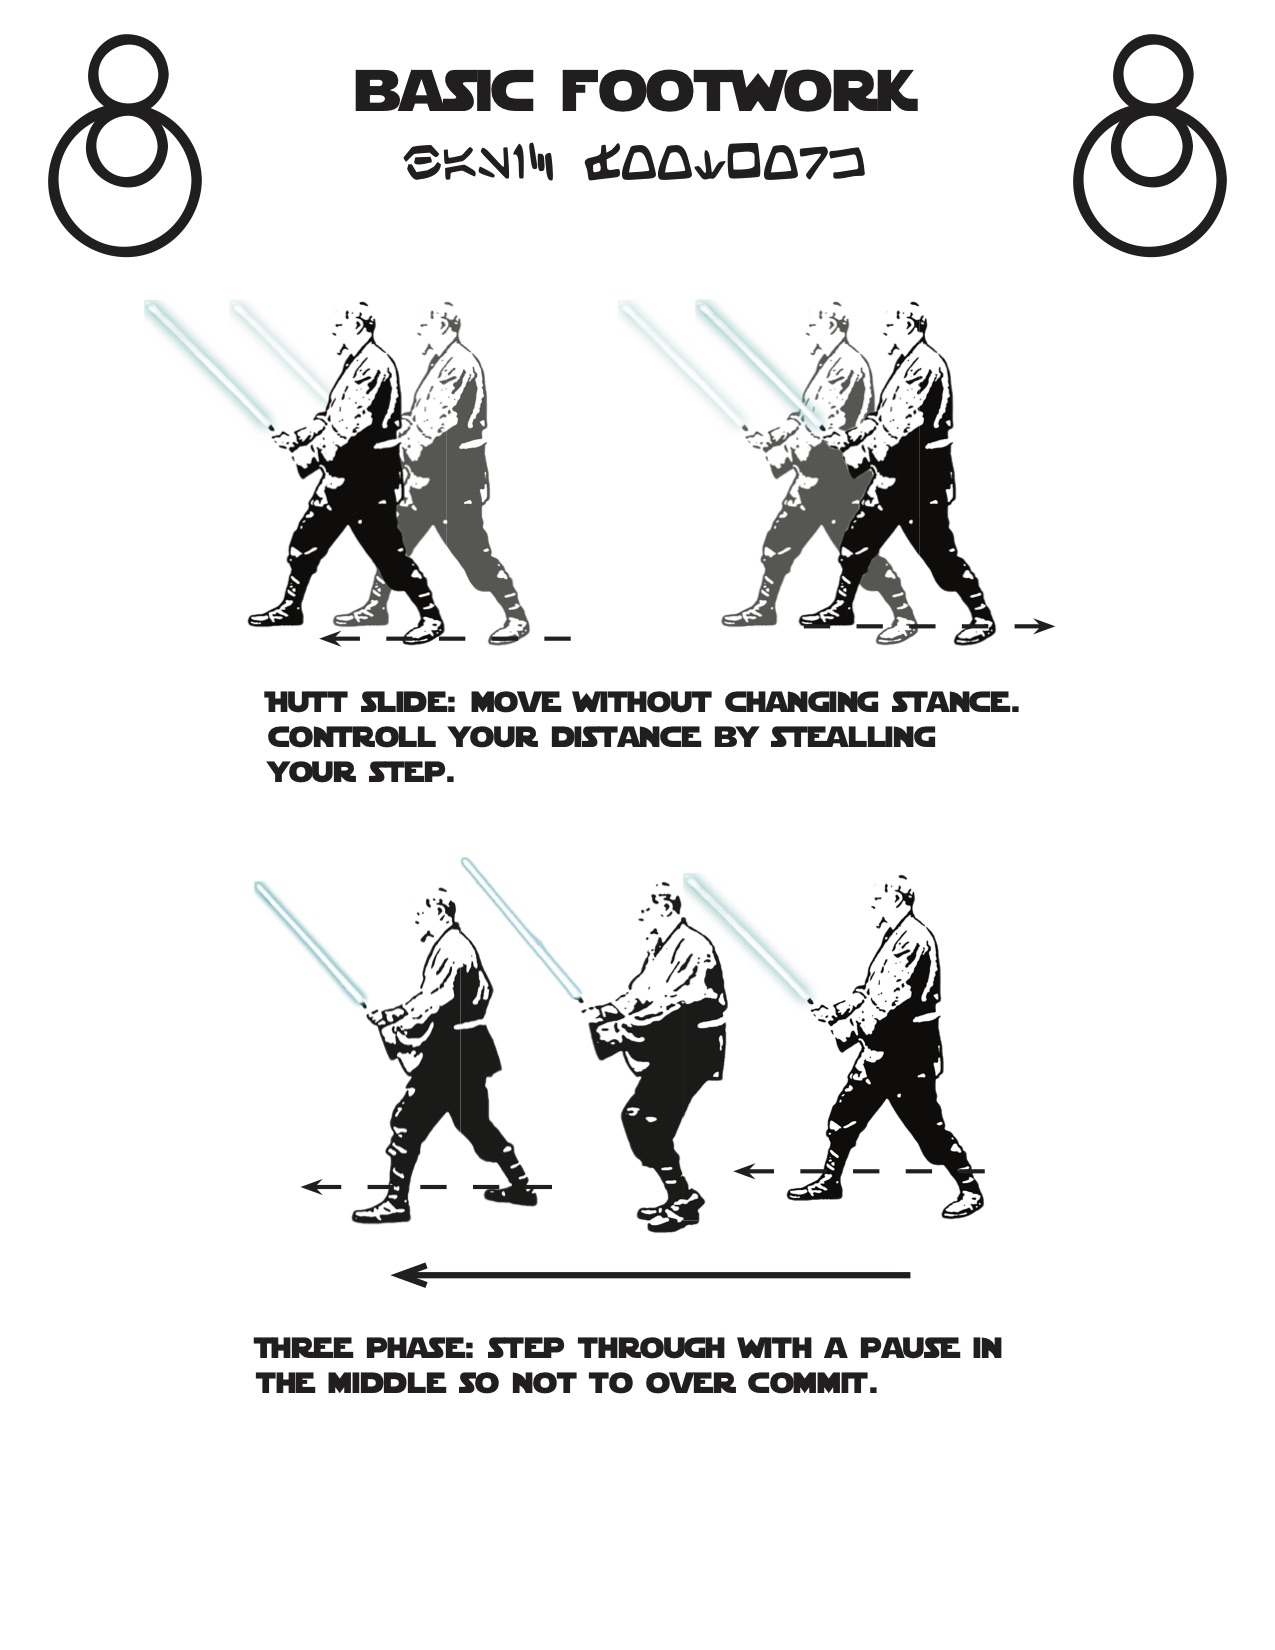
The three basic stepping motions or methods used in Shii-Cho are designed to keep one mobile and stable at the same time. Since this is a contradiction, the methods used are often counter intuitive for most bipeds. It takes time to integrate these steps together, but once accomplished, nothing is out of reach.
Hutt Slide
The Hutt Slide gains it’s name from two ideas. First is the idea of how Hutts in general move by sliding on the ground. The second is from the concept of “stealing” a step from your opponent. (The later is racially insensitive and should be avoided as Hutts are not individuals to anger. )
In attack stance, push off your back heel as you raise your foot just off the ground, causing it to slide forward. quickly slide your back foot back into position for a ready stance. As you do this move, tighten your center and focus your energy there. You legs will carry you as one piece. When standing still, keep the back leg loaded and the front leg ready to shoot out by keeping tension between them. When it is time to pounce, release the front break and your energy will issue forward. Be careful not to over extend or you will be off balance, but if you go from stance to stance, the mechanics should make you very stable.
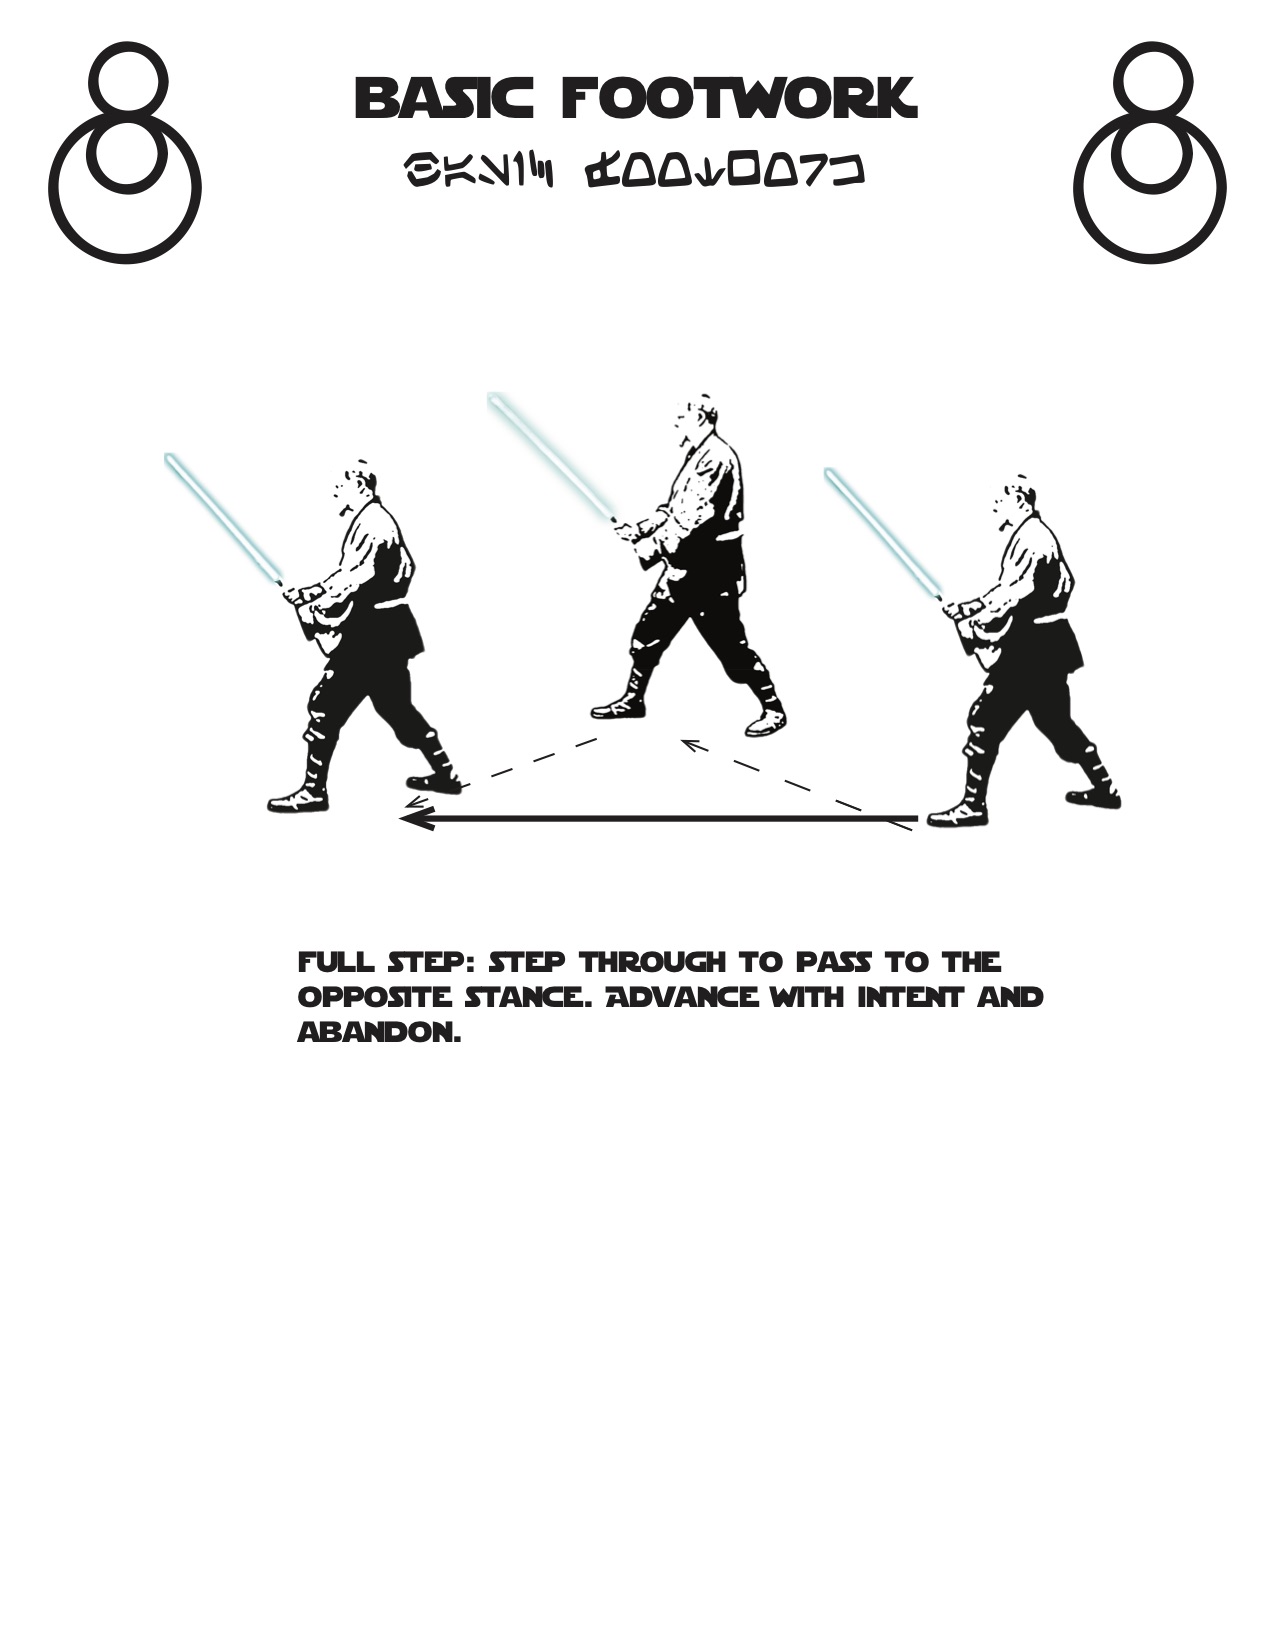
Full Step
A full step is a total change in stance. Since in saber combat we keep our stance in line, one of our lower zones is always forward or back. When switching between defense and attack, the back foot become the front foot by passing right next to the other. This allows the leg to pass naturally through to the other side and is the quickest way to travel over distance.
From attack stance, step through forward. Keep your feet close together as they pass each other . When you are stepping through, focus on the hips turning from one side to the other. The quicker you can get the hips to flip back and forth, the fast you can attack forward. A snap at the end of the step is also useful in developing power.
3 Phase step
The 3 phase step is like a full step with a pause in the middle. It allows one to measure and plan your next move. It also trains good stability while moving from leg to leg. The pause in the middle can afford you either advance or retreat but only if you fully commit to the one foot.
Begin as the full step. As the back foot comes into the center, have it pause with the toe just touching the ground forming a “T” shape. That foot then continues forward to reverse the stance and direction of the hips. This step is used in most accelerations because of it’s usefulness. When you step out for the final step, it is recommended that you use a Hutt Slide.
3 Stances
In addition to the “ready stance” which is considered merely a universal ready position, there are three other stances used for training and application.
Dew Back Rider
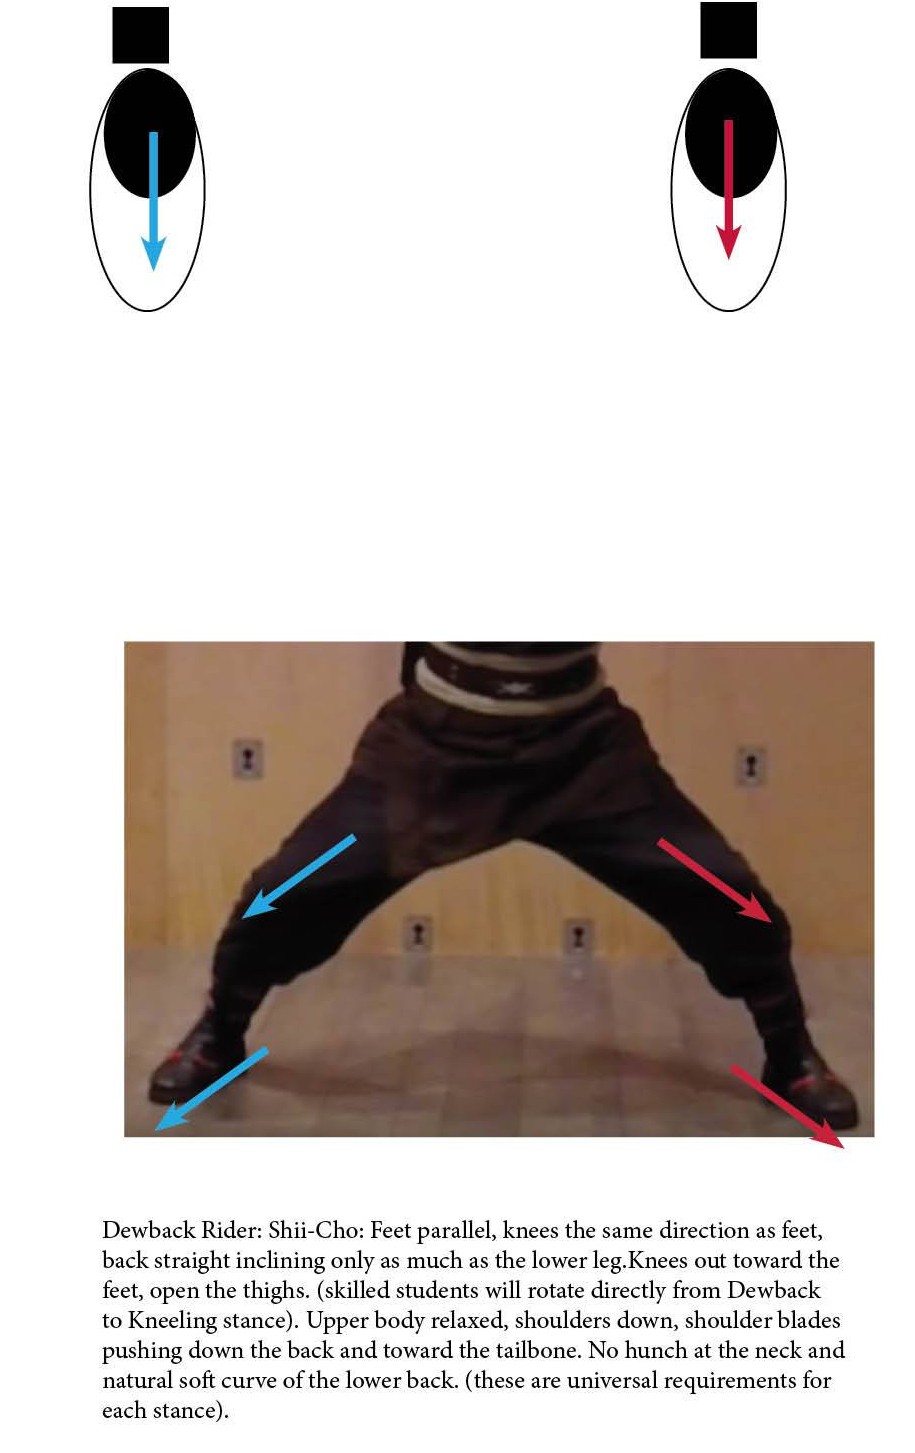
Stand with your feet set about one and a half (1.5) should widths and keep them about parallel. Rotate the legs outward so that the knees are going the same direction as the toes. Tuck the front of the hip and stick up the chest. This very stable stance is mostly used as a training device to teach discipline and forge the step of the body. The knees should not collapse in and one should strive to get as low as possible without bending at the spine.
Front Stance
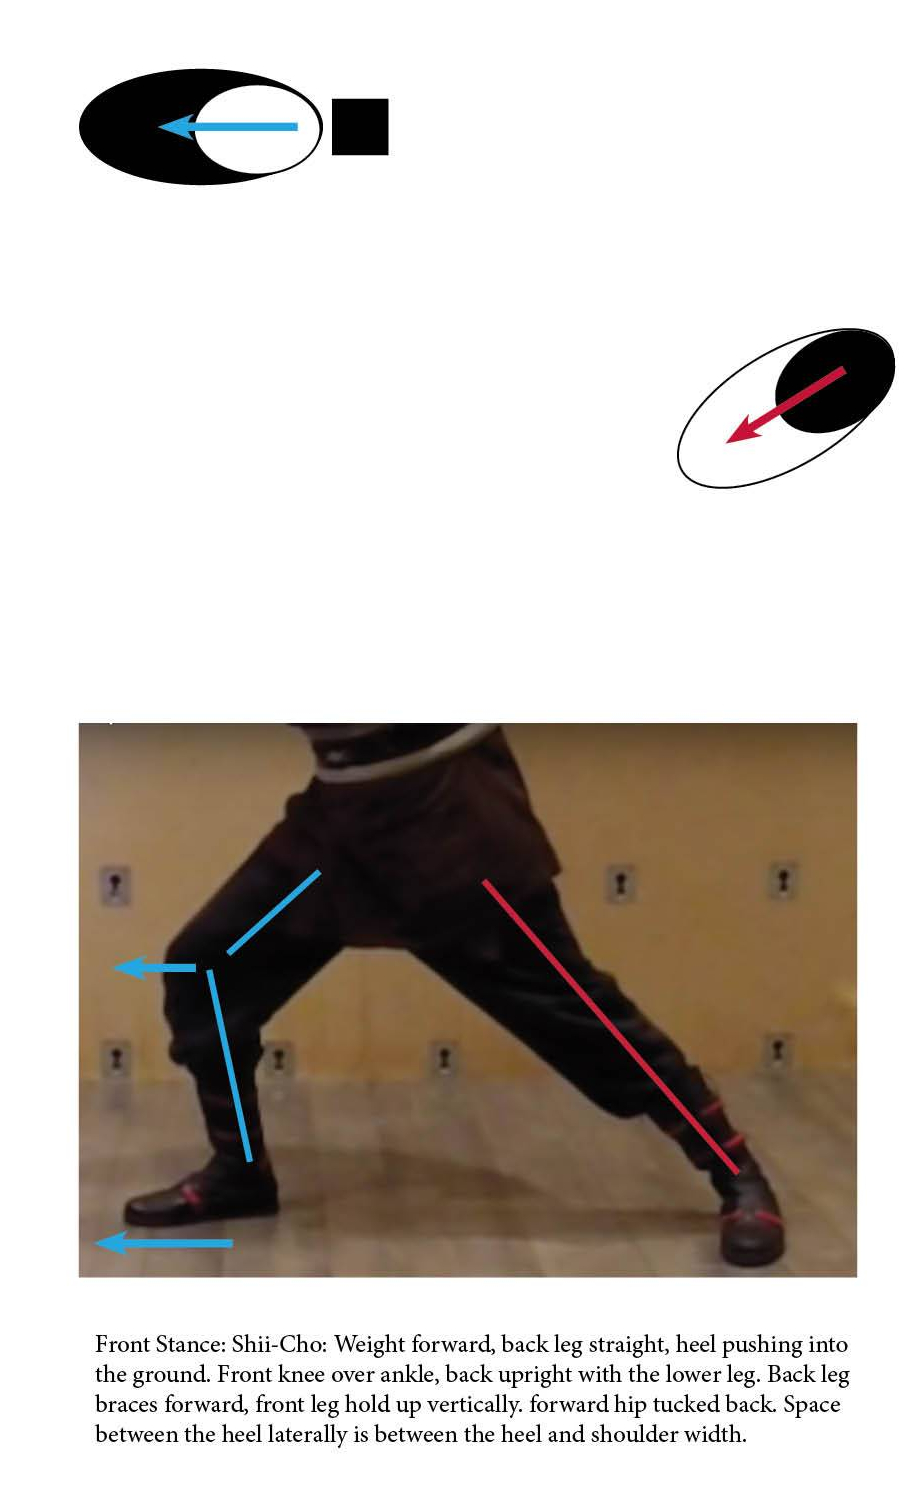
From Dewback rider angle one foot out about 45 degrees. Straighten the opposite leg so that your weight sinks onto the turned out foot. This is now your front leg. Twist the hips and feet to reverse the stance to the other side. The power comes from the shift and the straightening of the back leg as it pushes you to the side. This position is used for lunges and many front weighted techniques as well as being a great training stance.
Kneeling Stance
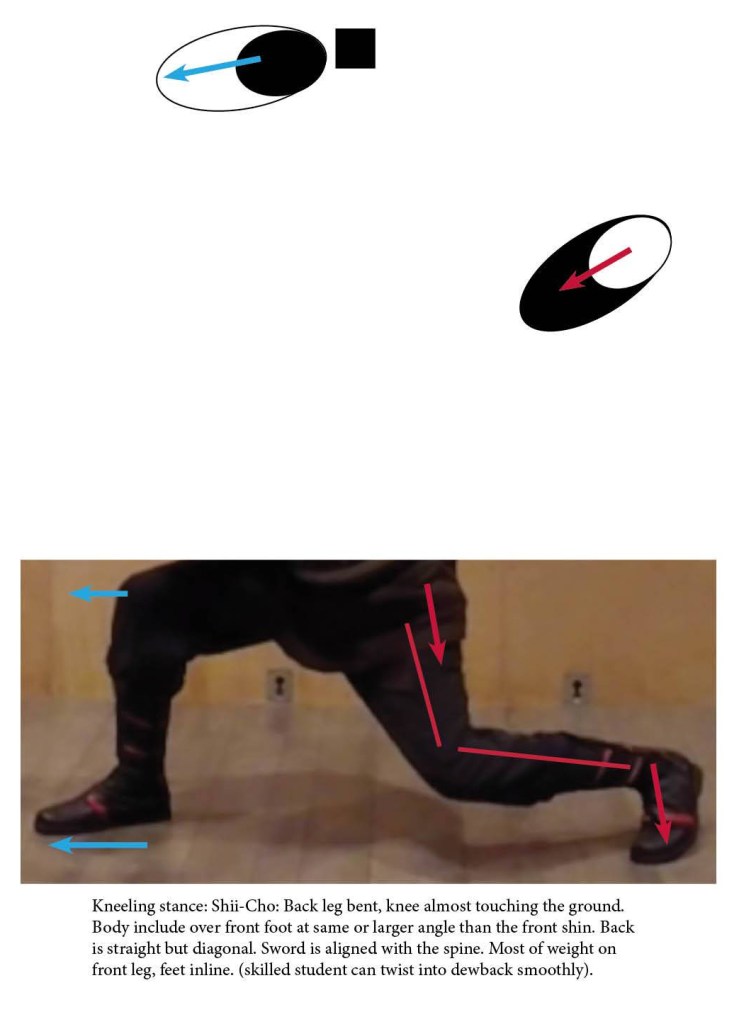
From front stance, bend the back knee down toward the floor. Sink the weight on to the front foot as you lower down. The heel of the rear foot comes off the ground and the ball of the foot pivots in place. Turn your legs like a pair of keys and shift your weight side to side. Be very careful to rotate from the hips and not the knees to avoid injury. This stance is used to perform low sweeps and ducking high attacks.
The 3 Strikes.
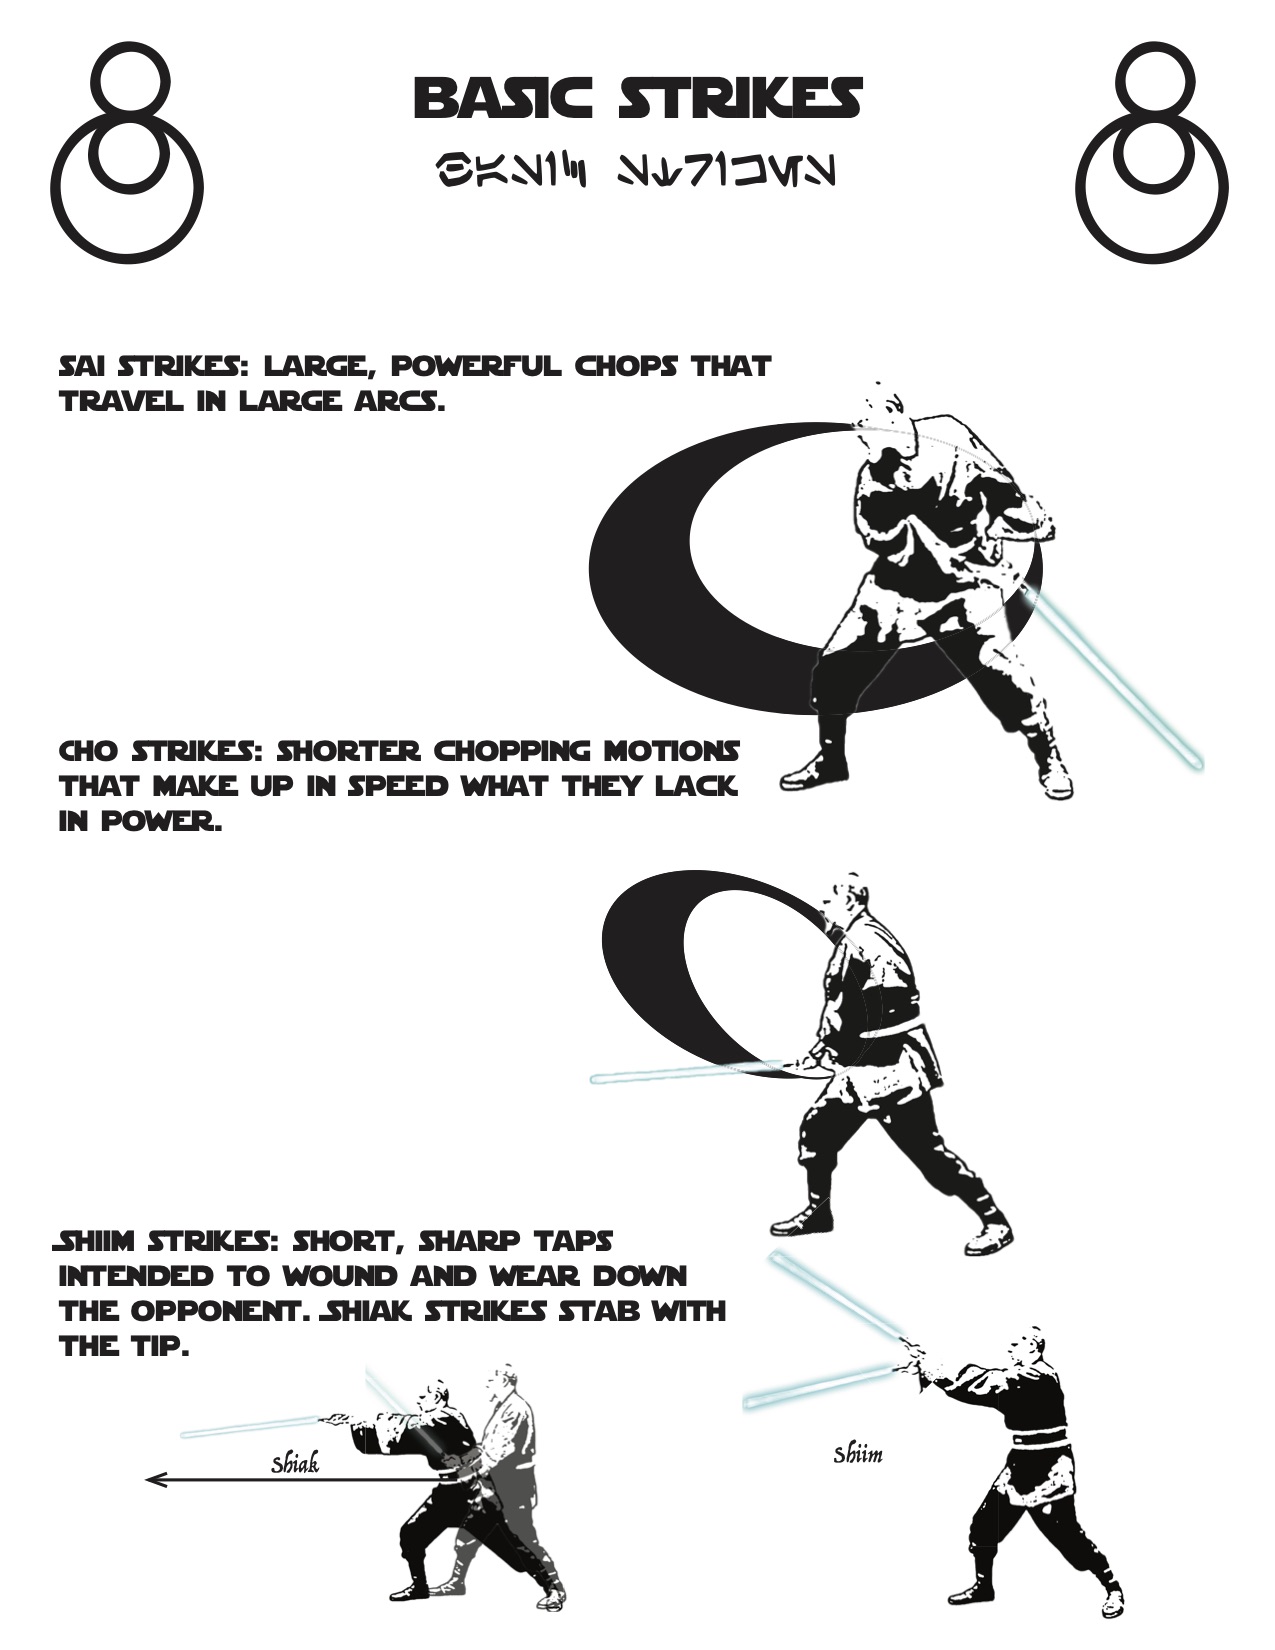
The final piece of the formula is the three strikes. There are those who divide the ways to strike with the saber into many methods. If we distill these methods to their most simple and basic principles, only three remain. We call them: sai, cho, and shiim/shiak.
Sai: This is a full amplitude strike with a follow through. The strike is powered by the body and also propels the body forward. The combination of these two forces allows one to completely slash through a target. Contrary to popular belief, lightsabers do not cut through everything equally. There is a requisite amount of inertia that must be built up in the blade. Sai is this method.
Cho: This is a chopping type motion. It is shorter than sai, and does not include a follow through. The object of cho is to produce the most amount of power with as little motion as possible. This will give one the best of both power and speed. Cho is used in combat extensively due to it’s ability to deal penetrating blows without opening one up to counter attack excessively.
Shiim/Shiak: These strikes are actually one. The movement is the same for each, but the stationary point is different. The action is like a lever or a water pump. Lift the hilt and let the blade tip drop as you extend forward, then stop it and make it come back as you retreat. If you keep the tip steady, you stab forward. If you keep the hilt steady, you will make a tag from the side.
The Three Parries
Preventing an attack from reaching you when using weapons is called parrying. Most people, when starting out, assume that a block or parry is intended to stop the moment of the opponent’s weapon. While this can be accomplished, it is advised to think about it as displacing and moving the attack instead. There are three types of Parries in Shii-cho:
Drop parries: Drop parries are accomplished by raising the hilt and letting the blade drop down to the side. These parries are excellent for receiving over head to zone 1 and side ward blows to zones 2 or 3.
Drop Parries do not always require the blade to be vertical. Even a slight angle will allow an incoming attack to slide off toward the side the blade is pointing. The important thing to keep in mind is that you blade must cover the area you wish to protect. It is often easy to raise the hilt above your head with the blade off to the side. This leaves your head and hands open to attack if the opponent notices this flaw.
Also important is that the blade must move through the parry and recover in one motion. This is accomplished by a stirring motion, often around the head. This motion keep the blade from falling inward toward you as it takes the force of the attack.
Shifting parries: Shifting parries occur when you keep the saber strong and nudge in coming attacks to the side. These parries are useful for thrusts and strikes to zones 2,3,and 4.
Shifting parries are the simplest and most effective way to parry most attacks to the body. They re especially good for defeating shiak thrusts to zone 4. The movement is very small and it is easy to over rotate into an attack, thus leaving you open on the other side. Recovery is quite efficient, however so these parries are favored by novices.
It is also important to remember that these are never done in isolation but must always be followed up with another technique-either escape or counter attack. It is not advisable that one should simply parry and disengage. Shii-Cho was designed for and on the battle field, unless you are moving forward or attacking, you are not going to survive. Even in one on one duels, prolonging the fight is never the better of the choices. These parries are so simple, that one can become afraid to use anything else. But,like any technique, thymus be used smartly and in the right context.
Turning Parries: Turning parries are most often done to the lower openings. When the opponent attacks low, intercept on one side, flip and hit the opposite. This parries must be performed quickly, yet they are often quite powerful and can disrupt the opponents weapon, even if the attack is unsuccessful.
Turning parries can be done at any level to guard and zone. The lower and upper variants are the most common. The great advantage is that these are both attacks and defensive techniques. These type of parries, while being the most difficult should be used reverse engagements and break through defenses.
Crossing the arms sometimes causes the uninitiated a bit of complaint. It is perfectly permissible for one to cross their arms. Provided one is practiced enough and honest enough with them selves the position can even provide superior leverage and support. The more important note is one of keeping your hands out away from your body. Wether over head or to the legs, do not spin the saber like a door. Turn it like a wheel.
This is the formula for The Way of the Sarlacc. Learn these basic elements well, for they will follow you through all of your training. Wether it be for a day, or a lifetime.
Characteristics of the Formula:
Shii-cho is the oldest and most storied of the “Forms” (as lay persons call them). It was the original form created for the weapon we use. From this technique, the refinements of the later methods becomes possible. There are basic characteristics that can help define the practice.
Simple, easy to learn techniques. The methods used in Shii-Cho are very simple, as reflected in the formula. Each strike is done with the body moving forward. A slight retreat is often done with a parry only to lurch forward again. One step, one strike. Shii-cho eschews complicated combinations and patterns for direct response and action.
Forward momentum. The Formula was specially designed for battlefield combat. The simple techniques are easy to teach to beginners quickly to a reasonable level of proficiency. This is measured by the tactics on the battlefield. A soldier in an army must move forward at all times. The clashing of two groups will define the conflict and the army that can continue to advance is often the victor.
360 degrees of awareness. Also an extension of the battle field scenario is development of awareness all around you. Originally, the chaos of the battle would require it, as well as the parries behind the back and other techniques that the uninitiated believe “open” one up to counter attack.
This is what characterizes Shii-cho to the majority of practitioners. There are of course variations, but they will all be able to be boiled down to this.
When practicing Shii-Cho by one’s self, one should think of constant forward movement, simple parry attack combinations, and full body engagement.
The Marks of Contact
The Marks of Contact are basic prescribed targets that traditionally have been taught to novices of swordplay. They are relatively easy to remember and are very simple in execution. Through research, I have concluded that the Marks may have been a part of a larger list, shortened and changed to trim the unneeded excesses. What we are left with is a very efficient, if somewhat abstract, system of targeting.
The Marks are categorized into their various strike families. Marks that require a sai strike are separate than those for cho, etc. Not only is this a convenient way to organize them, it can train the natural reaction of power and technique at the same times as targeting. Meaning, that when I target the body thinking of Sai Tok, my body and weapon are already making preparations for the full amplitude strike needed to go through a torso.
Some of the Marks are considered “Master Strokes” because they require a large amount of skill and practice to achieve. These strokes will be rare to see in free combat as fights with one who can successfully perform one are very short.
The Marks of Contact are as follows:
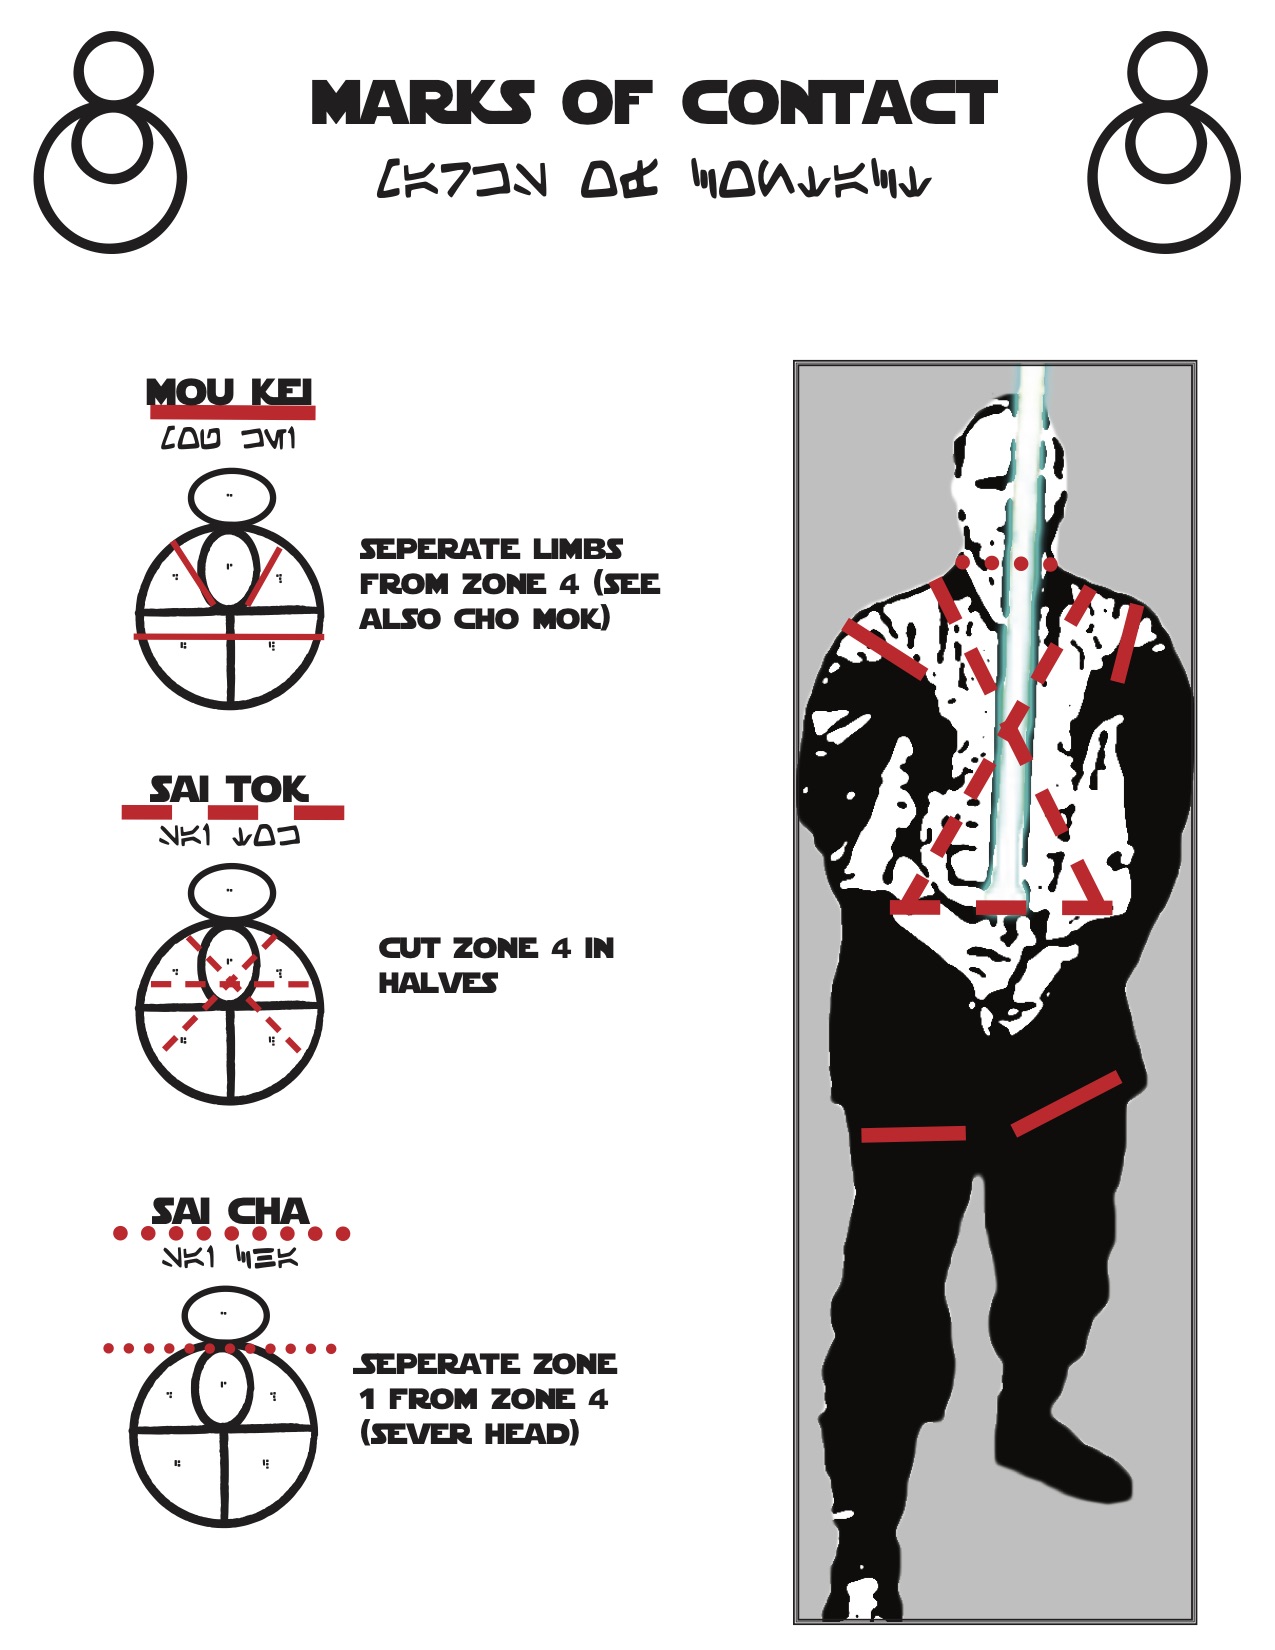
Sai: Sai is the full amplitude slashing strike that be used to go through large objects. The traditional Marks of Contact in this family are Mou Kei,Sai Cha (sever head) and Sai Tok (slash body).
Sai Cha
Severing the head is the obvious choice to end the confrontation with a minimum of fuss. It requires more than a modicum of skill, however, to be able to close in on your opponent, bind his weapon and perform a sai strike to the neck. It is considered a master stroke as it requires the upmost speed, accuracy, and timing.
Sai Cha may be performed in almost anyway that makes the removal of zone one possible. But there are higher and lower percentages of success. A very high percentage variation is performing a parry, placing the blade on top of the opponent’s and striking through to make the Mark.
Sai Cha cannot be considered when talking of executions. Only against a free opponent does the Mark apply.
Sai Tok
Slashing through the body is no easy feat. Even with a lightsaber, the force must be great to overcome the inertia and resistance it provides. Add to this, clothing, armor and even straps and belts will hinder the blades progress through the target. Like Sai Cha, a Master Stroke in the system as the skill required is high.
Sai tok can be done at any angle but must travel from one side of the body to the other bisecting the centerline. Targeting the waist and shoulders are the most common applications. The former is highly prized in combat.
Mou Kei
This Mark is often confused with Cho Mok, as both involve severing a limb. Mou Kei is the severing of several limbs with one wide, sweeping stroke. Hence it’s inclusion with Sai. True, the legs seem to be the obvious target for this Mark, it is equally valuable in the arms. If the opponent uses a two handed grip, slipping around past his guard will allow your to sever both in one stroke.
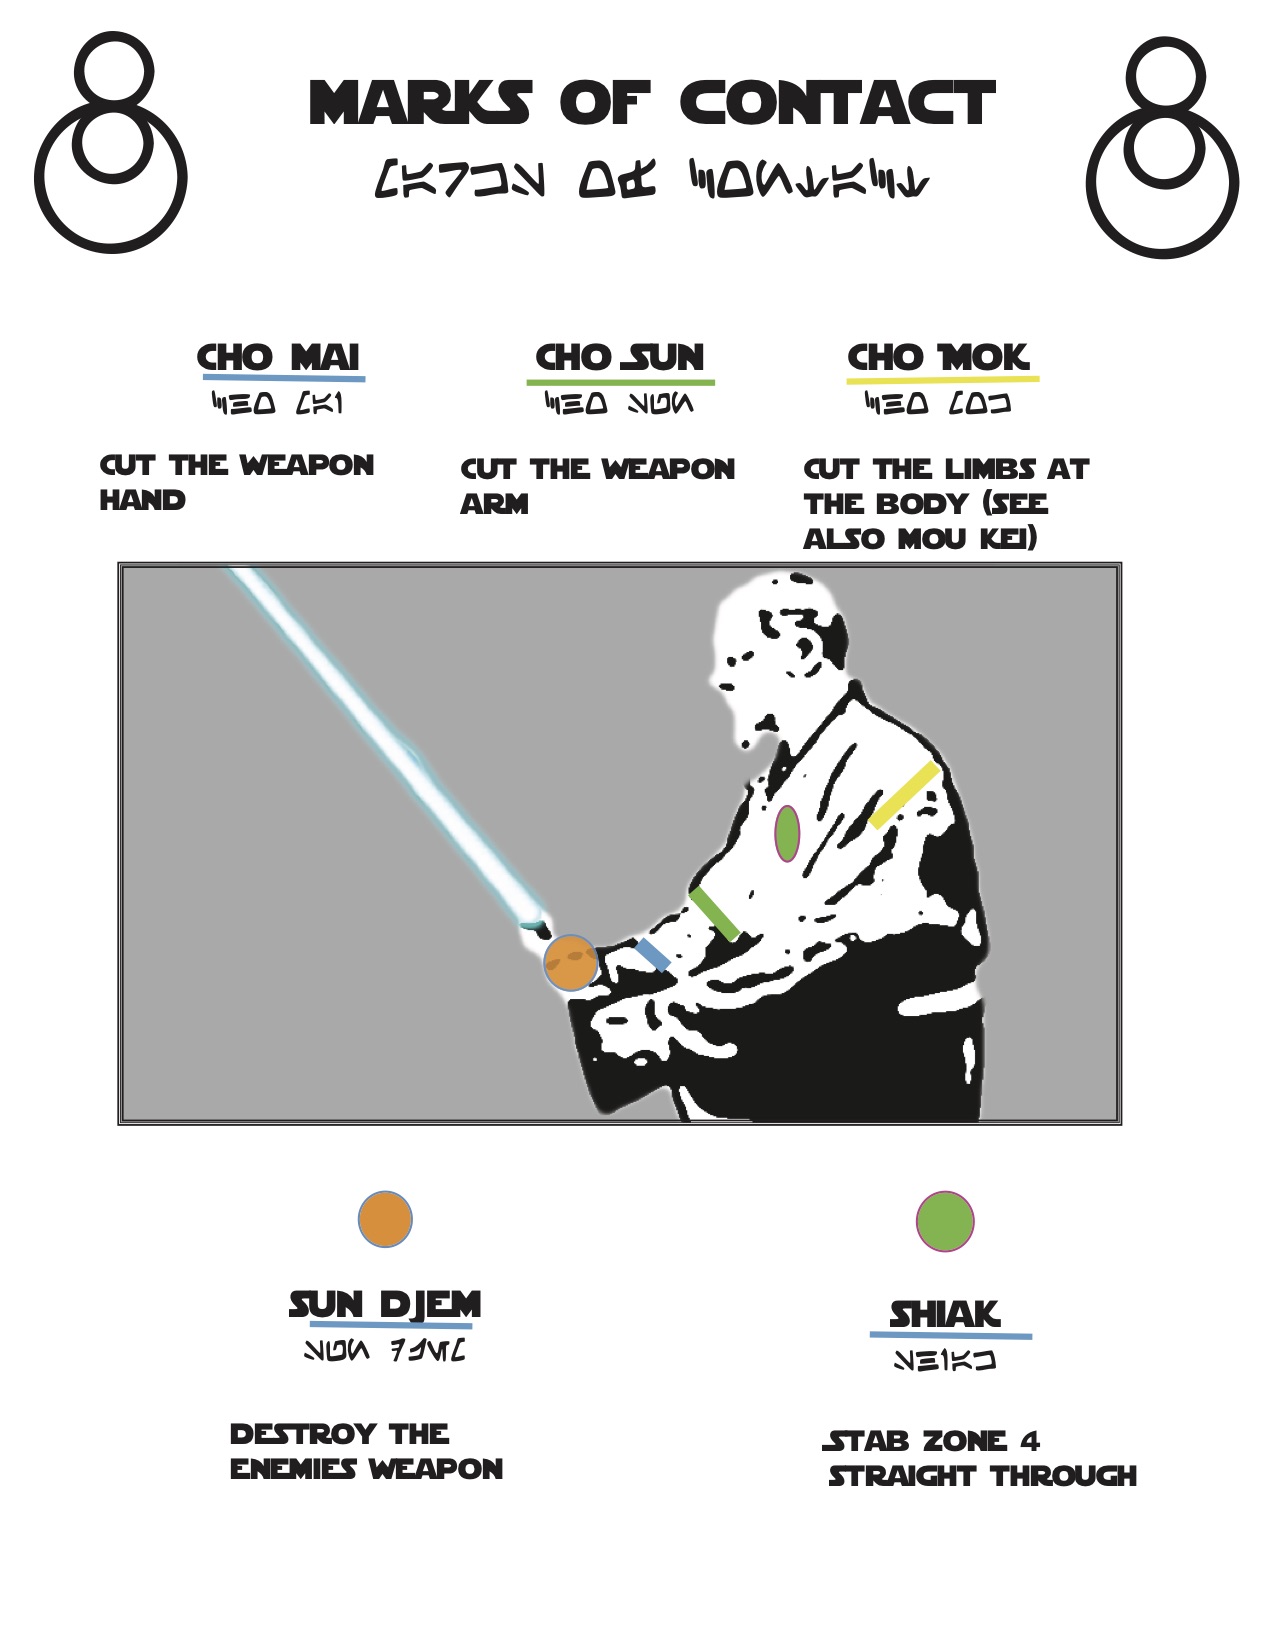
Cho: Cho are the short chopping motions. They excel at producing percussive force as well as being reversible. The traditional Marks of Contact for cho are: Cho Mai (chop hand), Cho Sun (chop joint) and Cho Mok (chop limb).
Cho Mai
Severing the hand is considered a Master Stroke. It is almost always referring to the weapon hand or zone 2. While the opposite hand can be severed, if it does not hold a weapon, little advantage is won. The obvious advantage to removing the hand is that is it often non lethal and completely nullifies the enemies ability to defend.
One should not underestimate the value as a psychological tactic. The injury it’s self is often so shocking to the person, that it stops them in their tracks.
Cho Sun
Cho sun is an interesting Mark. Attacking the joint can truly be any joint in any limb. Over time it has changed to mean exclusively the weapon arm at the elbow. Many of the Marks of contact, while associated and formulated in Shii-Cho, many of the changes in their application are a direct result of later adaptation from Makashi. Since in a one on one duel, it is most common to have the zone 2 arm as the primary target. But the Mark it’s self originally referred to any joint in any limb.
As stated above, this Mark is not often used. It is not a Master Stroke, not because of it’s lack of difficulty or other criteria, but because it’s usefulness is not wide ranging. Cho Mai is a much more common choice. Below or above the elbow is as well.
Cho Mok
This simply means severing a limb, and it implies the entire limb. It is considered by most to be brutish by nature. Tactically too, it’s value is questioned comparing to Sai Tok. Any and all limbs are included in this Mark originally. Battlefield and group warfare differ dramatically from single combat.
Cho mok is used in several situations. In a armored or battle field context one is targeting the weakest points in armor (like Cho Sun) and do the most amount of damage in the least amount of time. In single combat duels, the mark may present it’s self after a shot is missed.
Shiim/Shiak: Shiim and Shiak are actually Marks of Contact in and of themselves. While Shiak is often constrained in target area, Shiim is not. There are specific used for both. The Mark associated also with Shiim is Sun Djem (Destroy the weapon).
Shiak
Shiak is a thrust. It is most commonly done to zone 4, the body. Anywhere on the body or torso will do. Although it can be done to a limb, the limited surface area and speed at which it travels make this event more one of opportunity than planning. This same quality also gives you the advantage, however. Shiaks are difficult to defend as they come in straight and very quickly. Judging their distance and therefore setting timing, is very hard.
Shiak does not always have to be lethal. Shiak to the shoulder will incapacitate most beings with minimal long term damage. Shiak to the hip as well, in bipeds, will fell and opponent as quickly as Sai Cha with out killing them.
Sun Djem
Destroying the weapon is the most advantageous Mark there is in the system. Its the final master stroke and is it valued as being both effective and merciful. Riding your opponent of their weapon is an enormous advantage few should pass up.
Sun Djem means “slaying the dragon” and wile it is most commonly used to indicate the destruction of the weapon, disarms as well can be considered this Mark in some schools. Since disarms are fool hardy to try at novice levels, the concepts are usually kept from students until their masters deem them ready.
This is the formula for Shii-Cho. It is the core of the system. Understanding these methods will form a solid foundation for future skill.
Patience, Practice, Perseverance!
